
Guide to Successful Rooted Cuttings
Rooting plant cuttings is one of the most useful horticultural skills that nearly any gardener can attain. Plants, just like humans have a distinct genetic make up. They carry contrasting genetic traits, some favorable and some not as much. These traits, desirable or not are pre determined, and will be present throughout the whole life cycle of the plant.
In botany, favorable genetics are bred through a common ancestor to form a unique genetic code. These are further bred over multiple course's of generations to stabilize the desirable traits. The final generation’s seeds reliably grow into plants that exhibit the desired characteristics originally observed, however some genetic variation can and will still occur. The stabilized plants propagated are then given a cultivar name and are then released into production. Plant breeding is considered to be an art/science as it requires many years of cultivation and breeding experience on a molecular biological level.
For the average hobby or commercial horticulturist, cutting and cloning is a simple yet valuable process. However there are a few items needed and some important steps that need to be taken to ensure cloning success.
- Jiffy Peat Pellets/Rockwool Starter Plugs/Aeroponic Cutting Propagator (optional)
- Cut-Copy Rooting Gel
- Propagation Tray with Dome
- Heating Mat
- Compact Fluorescent Lamp
- Sterile, sharp blade
- Basic light source for Vegetative growth
- Shotglass/tumbler for Cut-Copy Rooting Gel
Selecting a mother plant
Firstly, a mother plant with the desired genetic traits needs to be selected. The plant chosen should be well established, mature and healthy. If the mother plant is diseased, unhealthy or stressed in any way, that will carry over to the cuttings as these are essentially the same plant. A successfully rooted cutting will be genetically identical to the mother plant being cut and will be exactly the same as the parent as long as the environmental conditions are matched.
Preparing the work area
Preparing for the procedure before hand is highly recommended. All of the items needed should be neatly arranged and accessible in preparation for the cuttings. Peat Pellets and Rockwool Starter Plugs need to be soaked in a pH’ed solution prior and should be ready to take on fresh cuttings. If an Aeroponic Propagator is going to be used, the system also needs to be prepared and ready to use. For best results it is advised to follow the steps below with a swift action, focusing on getting the job done as quickly and effectively as possible.
Choosing a propagation medium
Jiffy Peat Pellets are made from 100% Coco Peat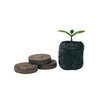 and are an inert, pH balanced medium which is ideal for rooting cuttings and starting seeds. Jiffy’s have excellent water and oxygen retaining properties, allowing for higher germination and rooting rates.
Rockwool Starter Plugs are made from  heating rock and spinning the molten mix into fibers which are then air cooled and compressed into blocks. Rockwool is also known for its excellent water and oxygen retaining properties and is a very popular medium, used for both rooting cuttings and starting seeds.
Aeroponic Cutting Propagators are systems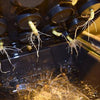 which suspend cuttings in the air where the cut is periodically sprayed by misters. Once roots grow into the misty air, they are then transplanted into full size hydroponics systems.
Taking Cuttings
Using a sharp, sterile blade choose a healthy branch or growth tip, preferably from the bottom half of your plant and make the cut 10-20 cm from the top of the growth tip. This should be done at a 45 degree angle in order to expose as much open surface area to the rooting hormone as the new roots will be growing out of the cut. There are a few different techniques to do this such as splitting and scraping, but the 45 degree cut is the most simple and effective. Next, trim all lower leaves from the cutting. Larger leaves near the top should be cut to half their size. This is to stop the cutting from turning light into energy and to instead focus on root development. Place the cuttings in a small glass of Cut-Copy Rooting Gel in preparation for the next step to prevent air (embolism) from entering the cut stem, causing the cutting to wilt.
Rooting Hormone
The best rooting hormones available come in gel form. 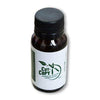 These are preferred because the gel will stick to the the plants stem to create an air tight seal, preventing any oxygen (embolism) from entering the cut. Soak the cutting in the rooting gel to ensure a maximum uptake of the rooting hormone which will increase the root development rate significantly.
Planting Cuttings
Once the cut has been made and the rooting gel applied, the cutting will need to be planted into its growth medium. It is advised to make a large enough hole in the medium so that the cutting can be planted without having the gel removed or scraped from the stem in the process. Once planted, secure the cutting in place by pressing the medium around the stem. If an Aeroponics Propagator is used, simply place the cutting with rooting hormone into the system and begin the rooting process.
Rooting Environment
So your cutting has been planted into your desired medium and is ready to go into its rooting area. A humidity dome is used to maintain a constantly humid environment and to prevent your medium from drying out. A Digital Hygrometer can be used at this point to monitor humidity levels. If needed a heating mat can be used to create warmth from below and a simple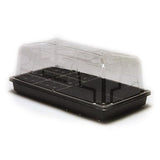 vegetative plant light can be used to create just enough light from above. If larger horticultural lights are to be used, it is advised to keep the light source some distance away as too much light will cause the cuttings to start converting light to energy instead of focusing on root development. Without a root system the only nourishment your cuttings can get at this point is through its leaves. This is why it is so important to maintain a humid environment right up until roots emerge from the bottom and/or sides of your medium. Once roots emerge from cuttings they should be treated as any other plant and can start feeding from the roots again. The best light cycle for rooting cuttings is generally 18 hours of light and 6 hours of darkness. Do not supply cuttings with 24 hours of light without any dark periods because this has shown to slow the rooting process down as plants root best with a sufficient dark period each day. After the cuttings have successfully rooted, they can be transplanted into their respective growing systems where they will develop a full sized root mass and grow into thriving adult plants.
Tips for successfully rooting cuttings
- Mist cuttings daily inside the humidity dome. This will ensure that the humidity levels inside the propagator remain high and will also provide nourishment for the rootless cuttings.
- Keep humidity levels above 90%.
- Use a “cool” spectrum CFL light on 18/6 light cycle which can placed a few centimeter above the propagation dome.
- Maintain a good root zone temperature of 22 – 26ºC, use a heat mat if necessary.
- Replace the humid air in the propagator once a day by removing the lid of the propagator, mist plants and replace lid.
- Do not let your cuttings medium dry out, water with distilled water as required.
- Use gel rooting hormone instead of powder.
- Take more cuttings than you actually need.
- Plant Markers can be used to label your clones.
- Once cuttings root, remove from the propagator and re-plant as soon as possible. High humidity environments will cause plants that have rooted to develop algae/bacteria.
Leave a comment